Home / Blog / Materials & Construction
Dry Bag Valve Types and How to Use Them
Dry bag valves fall into 3 practical groups: one-way purge valves, two-way inflation valves and screw plugs. A 20 L bag can release 4 to 7 L of trapped air in about 8 to 20 seconds through a well-sized purge valve, reducing bulk by 20% to 35% without reopening the roll-top. The right valve must match the job, remain closed under external water pressure and be positioned where packed gear cannot press it open.
A valve adds control, but it also adds a seal, a welded flange and a moving part to a bag that could otherwise be almost featureless. This guide compares mechanisms, flow rates, materials, installation zones and cleaning routines. It explains when compression is useful, when inflation is appropriate, how to distinguish a valve problem from a seam leak, and why a simple no-valve construction remains the best option for many day bags.
- The jobs a dry bag valve can perform
- How one-way purge valves work
- Two-way valves, plugs and inflation control
- Valve bodies, seals and flange materials
- Positioning the valve on a usable bag
- Flow rate, port size and compression time
- The correct way to purge a closed dry bag
- Inflation limits and safety boundaries
- Cleaning grit, salt and sticky membranes
- Testing a valve for air and water leakage
- Diagnosing faults and deciding on repair
- Specifying valves for a production run
- Choosing a valve type with a simple decision rule
The jobs a dry bag valve can perform
A valve can exhaust trapped air, admit air, or do both according to its internal path. Exhaust matters when clothing, a sleeping bag or a padded jacket traps enough air to make the closed bag bulky. Inflation matters in specialist storage or flotation-adjacent uses where a controlled air cushion protects contents, although the bag must never be treated as personal safety equipment. A removable plug provides the fastest unrestricted path, while a one-way membrane offers slower flow with less chance of accidental backfill.
The task should define the hardware. A 5 L electronics pouch gains little from a 28 mm valve that occupies panel space and can touch the device. A 40 L compression duffel may save 12 L of packed volume when air is purged after closure. The choice is therefore not “valve equals premium”; it is whether controllable airflow solves a measured problem. The comparison in purge valve versus no valve is a useful starting point before adding another potential water path.
| Valve type | Air direction | Typical clear bore | Best application | Main trade-off |
|---|---|---|---|---|
| One-way purge | Out only | 8-16 mm | Compressible clothing | Slower refill |
| Two-way screw | In and out | 12-22 mm | General air control | Must be tightened |
| Removable plug | In and out | 18-30 mm | Fast emptying | Loose part risk |
| Push-button valve | Controlled outflow | 6-12 mm | Frequent compression | Can be pressed by gear |
| Membrane check valve | Out only | 5-10 mm | Compact packs | Sensitive to grit |
How one-way purge valves work
A one-way purge valve contains a flexible disc, flap or duckbill that lifts when pressure inside the bag exceeds pressure outside. Squeezing the packed body creates that differential, air passes the seat, and the elastomer returns against the sealing face when pressure falls. The mechanism needs no spring, which keeps it light and resistant to corrosion. Its effectiveness depends on a smooth seat, the correct membrane hardness and enough open area around the internal cage to prevent a jacket or liner from blocking flow.
One-way does not mean invulnerable. A grain of sand 0.4 mm across can hold a membrane off its seat and create a capillary route for water. Oil, sunscreen and detergent residue can make a silicone flap stick or swell. Before closing, inspect the outside cap and press the membrane only as the instructions allow. If the bag will be dragged through surf, orient the port away from the leading face and keep its protective cap fitted even when the internal check element appears to seal on its own.
Two-way valves, plugs and inflation control
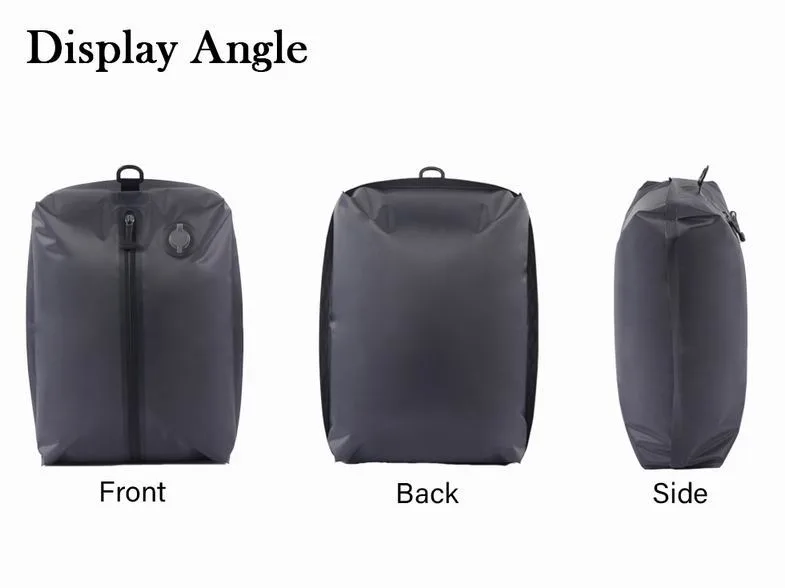
A two-way screw valve opens a direct path when its cap or centre insert is loosened. It moves air quickly and allows the body to be reinflated for easier packing, cushioning or drying. The disadvantage is human error: a cap that looks seated may still be one thread short of sealing. Coarse threads tolerate sand better than fine threads, while a captive cap prevents loss. A visible O-ring provides the primary seal and should compress evenly without being crushed flat by excessive torque.
Removable plugs are simpler and faster but need a tether that cannot interfere with the sealing face. They suit controlled environments more than a moving deck, because dropping a plug leaves a large open port. Inflation should use low pressure from lungs or a hand pump, never a high-output compressor. A soft waterproof bag needs shape, not rigidity; raising it above a few kilopascals can peel a flange or overload seams. Read the mechanism description alongside our pressure differential guide before using air as structural support.
Valve bodies, seals and flange materials
The body is commonly moulded from TPU-compatible polymer, nylon or acetal, while the moving seal uses silicone, EPDM or another resilient elastomer. Material compatibility matters at the flange. A TPU flange can be radio-frequency welded directly to TPU laminate, creating a continuous bond without needle holes. A hard body may instead be captured by a soft weldable flange. Adhesive-only attachment is less predictable under repeated flexing unless the chemistry, surface preparation and cure process are tightly controlled.
Seal material should match temperature and contamination. Silicone remains flexible in cold weather and handles repeated compression, but some oils can affect its surface. EPDM performs well around water and mild cleaners but needs confirmation for low-temperature flexibility. Hard nylon threads resist deformation, while acetal offers smooth operation and low moisture uptake. Ask for the actual material names and operating range rather than accepting “waterproof plastic.” The ASTM International catalogue provides test frameworks for polymer and elastomer properties used in material qualification.
| Component | Common material | Working temperature example | Useful property |
|---|---|---|---|
| Weldable flange | TPU | -20 to 60 °C | Bonds to TPU laminate |
| Rigid body | Acetal | -30 to 80 °C | Stable threads, low friction |
| Check membrane | Silicone | -40 to 100 °C | Cold flexibility |
| O-ring | EPDM | -35 to 90 °C | Water and weather resistance |
| Protective cap | Nylon 6 | -20 to 70 °C | Impact resistance |
Positioning the valve on a usable bag
The best location is reachable after closing, clear of the main fold and protected from abrasion. On a cylindrical roll-top, place the centre of the flange roughly 80 to 140 mm above the base or on the upper sidewall where one hand can squeeze and the other can operate the cap. A base valve drains air efficiently when the bag lies flat, but it also takes direct impact on rock and can sit in water. Back-panel placement protects hardware yet may let packed objects press a button valve.
Map the real load before finalising the port. A sleeping bag creates broad soft pressure, while cookware can place a hard edge directly against the internal cage. Leave at least 25 mm between the flange weld and another weld, reinforcement edge or fold line so heat zones do not overlap. On a backpack, keep the valve away from lumbar contact and shoulder-strap roots. The seam photograph in our welded versus stitched seam guide helps explain why crowded weld geometry is difficult to inspect.
Flow rate, port size and compression time
A larger port is not automatically faster once the contents obstruct the inside. Flow depends on clear area, pressure difference, valve path and how quickly the user can squeeze the bag without shifting the closure. A 10 mm check valve may purge a soft 20 L load in 15 to 25 seconds; a clear 20 mm screw port may do it in 6 to 12 seconds. The faster port also removes more panel area and needs a wider flange, so compact bags often favour controlled rather than maximum flow.
Measure performance with a repeatable load. Pack the same 1.2 kg synthetic quilt, close with three rolls, record the initial circumference, then time the squeeze until air flow stops. Repeat five cycles and note final dimensions rather than relying on sound alone. Compression ratio belongs to the contents as much as to the valve: a fleece may shrink 35%, whereas folded maps shrink almost none. This is why a flow specification should name load, starting volume and applied force.
| Bag and load | Air removed | Port diameter | Typical purge time | Packed reduction |
|---|---|---|---|---|
| 10 L clothing bag | 2.0-3.0 L | 8 mm | 10-18 s | 18-25% |
| 20 L quilt bag | 4.0-7.0 L | 10 mm | 15-25 s | 22-35% |
| 30 L jacket bag | 6.0-10.0 L | 16 mm | 10-18 s | 20-33% |
| 40 L duffel | 8.0-13.0 L | 20 mm | 8-15 s | 20-32% |
| 5 L electronics pouch | 0.3-0.8 L | 6 mm | 5-10 s | 6-16% |
The correct way to purge a closed dry bag
Pack soft items below the valve, wipe the roll-top clean and make three even folds before engaging the buckle. Open the external cap if the design requires it, then press with forearms across a broad area rather than kneeling on one point. A broad squeeze moves air without creating a sharp stress peak. Stop when the body conforms to the load; forcing the last pocket of air out can make rigid objects push against the laminate and may distort the valve seat.
Close the cap while maintaining light pressure, release the bag and listen for inward leakage. The body may relax slightly as clothing rebounds, but it should not draw visible water through a wet valve. Keep enough air to prevent cookware or buckles from forming hard contact points against the film. The question does a dry bag need a purge valve is answered by this routine: if broad manual pressure cannot reduce a compressible load meaningfully, the added hardware brings little practical benefit.
Inflation limits and safety boundaries
Inflating a dry bag can provide shape for inspection, create a little cushioning around fragile gear or help locate a slow air leak. It must not turn the bag into a high-pressure vessel. Add only enough air to remove wrinkles, generally below 2 kPa for a flexible article unless a validated specification says otherwise. A bicycle pump can exceed that level in seconds. Never sit, jump or stand on an inflated bag, because dynamic pressure can multiply the load at a seam or flange.
A trapped-air bag may float, but neither a valve nor buoyancy makes it a life jacket. Personal flotation equipment has purpose-specific design and testing that a storage bag lacks. The ISO publishes standards across safety and product testing fields, and applicable flotation rules should be treated separately from waterproof storage claims. Keep inflated bags away from heat, where expanding air raises internal pressure, and vent them before aircraft altitude changes if the body becomes tight.
Cleaning grit, salt and sticky membranes
Rinse the closed valve with fresh water after salt, sand or muddy use, then open it over a clean tray and flush the permitted path at low pressure. Operate a push button several times while submerged in clean water so particles can leave the seat. Use a soft swab around threads but never insert a pin through a membrane. Strong solvent, petroleum lubricant and concentrated bleach can change elastomer dimensions or damage the laminate surrounding the flange.
Dry with the valve open and the bag mouth supported so air can move through both openings. Once dry, inspect the O-ring for flattening, cracks or twisting and apply only the lubricant named for that material. A trace of compatible silicone grease may suit some O-rings, but it attracts dust if applied heavily. For a full cleaning sequence, combine these steps with the roll-top cleaning guide. Close the cap loosely during storage to protect threads without keeping the seal compressed for months.
Testing a valve for air and water leakage
Begin with a low-pressure air test because it localises faults without driving water into the bag. Close the roll-top, add enough air for gentle firmness, then brush a dilute mild-soap solution around the flange, cap and stem. Growing bubbles identify the path. Rinse immediately after inspection. The air inflation leak test gives the wider sequence for seams and panels. Mark the precise point with removable tape rather than writing on a wet TPU surface.
Follow with a controlled shallow-water check only if the design is intended for immersion. Keep the valve 100 to 200 mm below the surface for the specified interval, avoid squeezing the body underwater and place dry absorbent paper inside as an indicator. Test the valve separately from the rolled mouth by holding one above water when the other is examined. Ingress classifications are defined through IEC 60529; the IEC source is preferable to treating an informal dunk as an IP rating.
| Check | Pressure or depth | Duration | Pass evidence | Likely fault if failed |
|---|---|---|---|---|
| Visual seat check | None | 30 s | No grit or cuts | Contamination |
| Soap-bubble air check | Gentle firmness | 60 s | No growing bubbles | Cap, stem or flange leak |
| Shallow immersion | 100-200 mm | 5 min | Indicator remains dry | Seat or weld path |
| Five purge cycles | Hand pressure | 5 cycles | Repeatable closure | Sticky membrane |
| Overnight hold | Low pressure | 8 h | No major collapse | Slow seal leakage |
Diagnosing faults and deciding on repair
Air escaping around the cap points to an O-ring, thread or seat issue; bubbles from the flange edge point to the weld or adhesive bond. A membrane that exhausts but allows rapid return may be folded, dirty or permanently set. First clean and retest. Replace a removable O-ring only with the specified diameter, section and material. An almost-correct ring can feel tight yet leave a microscopic path or place enough force on the cap to damage its threads.
Do not attempt to heat-weld a loose flange with a household iron. Controlled welding depends on tooling, energy, pressure and dwell time, while nearby film can be weakened without obvious surface damage. A mechanically replaceable valve can be serviced according to its instructions; a welded flange generally needs assessment by a qualified repair point. Retire the bag from immersion-sensitive use if cracks radiate from the port, the panel has delaminated, or a repair cannot be pressure-checked.
Specifying valves for a production run
A useful valve brief names function, clear bore, opening force, material, cap retention, panel position and pass criteria. Add cold and warm operating temperatures, expected cycle count and the exact mating laminate. Approval should include at least 100 purge operations, five low-pressure leak checks and samples conditioned at the intended temperature extremes. Colour and profile matter for appearance, but a black cap that hides cross-threading may be less usable than a contrasting witness line showing whether it is fully closed.
Production since 2014 in an SGS-verified 4,950 m2 facility with 149 machines provides a practical basis for aligning flange material, RF tooling and inspection access. A 500-piece minimum, samples in 6 to 10 working days and bulk production in 35 to 50 days allow valve placement and sealing performance to be checked before scale-up. For a view of waterproof bag development and available formats, visit our production team and bring a measurable airflow target rather than a generic request for a valve.
Choosing a valve type with a simple decision rule
Choose a one-way purge valve for sleeping gear and clothing when reducing bulk after closure is the main task. Choose a two-way screw valve when controlled reinflation or fast drying is also required. Use a removable plug only where losing it is unlikely and rapid unrestricted flow matters. Leave the valve out of small electronics pouches, frequently submerged grab bags and products where the load cannot compress. Fewer components generally mean fewer inspection points and easier field care.
Whatever mechanism is selected, judge it as part of the whole waterproof envelope. The flange should match the laminate, the port should remain accessible with the intended load, and the cap should be obvious when open. Confirm flow with real contents, confirm sealing with separate air and shallow-water tests, then document cleaning and replacement parts. Users who understand those boundaries gain a smaller, more manageable package; users expecting the valve to create pressure-rated flotation are asking it to perform the wrong job.
When two options perform equally, prefer the mechanism with fewer loose parts, clearer open-and-closed indication and easier access for rinsing. Ask a new user to operate it without coaching, then inspect whether the cap was fully seated and whether the bag stayed comfortably closed. This short usability trial often exposes tiny controls, confusing thread engagement or a port hidden by the packed load. A valve that works only on a bare sample is not a successful choice for field use.
Frequently asked questions
Q1. What type of valve is best for a dry bag?
A one-way purge valve is best for most compressible clothing and sleeping gear because it releases air after the roll-top is closed. Choose a two-way screw valve only when controlled inflation or faster drying is also needed.
Q2. What does a purge valve do on a dry bag?
It lets trapped air leave while the waterproof closure remains shut. Removing 4 to 7 L from a packed 20 L bag can reduce bulk by roughly 20% to 35%.
Q3. Can water enter through a one-way valve?
A clean, undamaged valve should resist reverse flow within its design limit, but sand, hair, detergent residue or a deformed membrane can hold the seat open. Keep the protective cap closed around water.
Q4. Should every dry bag have a valve?
No. Small bags, rigid loads and frequently submerged grab bags often benefit from simpler construction. Add a valve only when measured compression or air control outweighs the extra seal and service point.
Q5. How do I use a dry bag purge valve?
Pack and roll the bag three times, open the permitted cap, press broadly across the soft load, stop when the body conforms to the contents, close the cap under light pressure and check that air does not return.
Q6. Can I inflate a dry bag with a bicycle pump?
It is not advisable. A bicycle pump can create damaging pressure very quickly. Use lung pressure or a low-pressure hand pump only when the instructions explicitly permit inflation.
Q7. How much pressure can a dry bag valve take?
There is no universal value. Flexible storage bags commonly need only enough pressure to remove wrinkles, often below 2 kPa. Use the tested limit for the complete bag, not just the valve component.
Q8. Why is my valve leaking air?
Common causes are grit on the seat, a twisted O-ring, a cross-threaded cap, a folded check membrane or a damaged flange weld. Clean, inspect and perform a soap-bubble test to locate the exact path.
Q9. Can a dry bag valve be replaced?
Mechanically retained valves often can be replaced with the specified part. A welded flange usually requires specialist equipment and inspection. Do not improvise heat repairs with an iron.
Q10. How should I clean a dry bag valve?
Rinse with fresh water, operate the mechanism in clean water, brush threads gently and dry it open. Avoid pins, petroleum oils, strong solvents and concentrated bleach.
Q11. Where should a valve be positioned?
Place it on an accessible protected panel, away from fold lines, base abrasion, harness contact and hard contents. Leave at least 25 mm between its flange weld and another major weld.
Q12. Does valve size control compression speed?
Port area matters, but internal blockage, pressure difference and valve path also control flow. A larger port may offer little benefit if a quilt seals against its inner cage.
Q13. Can a valved dry bag be used as a flotation device?
No. Trapped air may make it float, but a storage bag lacks the fit, redundancy and purpose-specific testing of personal flotation equipment.
Q14. What is the difference between a plug and a check valve?
A plug opens a direct two-way path when removed. A check valve uses a membrane that permits flow mainly in one direction and closes automatically when pressure reverses.
Q15. How often should a valve be inspected?
Inspect it before water exposure and after every sandy or salty trip. A deeper check of the O-ring, membrane and flange each month is sensible during frequent use.
Q16. Is a valve useful for electronics?
Usually not in a small pouch because electronics do not compress and may press against the port. A larger padded system can use a valve for surrounding clothing, but the device still needs impact protection.
People also ask
What is a dry bag purge valve?
It is an air outlet fitted through the waterproof panel. The user closes the bag, squeezes compressible contents and releases trapped air without reopening the roll-top.
How does a one-way dry bag valve work?
Internal pressure lifts a flexible membrane from its seat so air exits. When pressure falls or reverses, the membrane returns to the seat and blocks the path.
Why do compression dry bags have valves?
The valve removes air that would otherwise keep sleeping bags and clothing bulky. It allows compression after the main closure has been sealed.
Can you repair a leaking dry bag valve?
You can clean seats and replace specified removable seals. Cracked bodies, damaged panel laminate and failed welded flanges normally need professional assessment or retirement from critical use.
Does a purge valve make a dry bag waterproof?
No. Waterproof performance still depends on panel laminate, seams, closure and correct use. The valve is another part of that envelope and must pass its own leakage check.
How do you test a dry bag valve?
Use gentle air pressure and soap solution to locate bubbles, rinse it, then perform a controlled shallow immersion with absorbent paper inside if the bag is designed for that exposure.
Need this in production volume?
QUANZHOU JUNYUAN BAGS has produced waterproof bags since 2014 in an SGS-verified 4,950 m2 facility in Fujian, China. Minimum order 500 pieces, sampling in 6–10 working days, bulk in 35–50 days, FOB Xiamen — write to service@junyuanbags.com with your spec and target market.